Install Laravel 5.5

To install Laravel 5.5 you need launch composer create-project as usual and you need to set the “dev-develop” version of the laravel/laravel package:

On packagist, if you look at “laravel/laravel” packages, you can see that there is a version named “dev-develop

composer create-project --prefer-dist laravel/laravel blog dev-develop

or you can install it by

laravel new myProject --dev

If is there any command error then update your composer

composer self-update

Where:

  • laravel/laravel: is the package for Laravel installation;
  • blog: is the new directory for your new project (you can change it);
  • dev-develop: is the next version of Laravel.

Then you can enter in the new directory and execute the artisan command:

$ cd blog
$ php artisan --version
Laravel Framework 5.5-dev

Laravel 5.5 will require PHP 7.0+. Along with developer features, PHP 7 includes speed improvements which will decrease CPU load by half. So, you should definitely make this upgrade. And if you are using Laravel 5, making this upgrade will be a lot easier since you using the latest version of PHP.

Enjoy learning a bit more about laravel 5.5 here: https://laravel.com/docs/5.5

Laravel 5.4 create repositories using command

Simple repository setup for Laravel 5.4

Installation

  1. Copy BaseRepository.php into App/Repositories
  2. Copy repository.stub into App/Console/Commands/stubs
  3. Copy MakeRepositoryCommand.php into App/Console/Commands
  4. Add MakeRepositoryCommand:class into the App/Console/Kernel.php

class Kernel extends ConsoleKernel
{
    /**
     * The Artisan commands provided by your application.
     *
     * @var array
     */
    protected $commands = [
        Commands\MakeRepositoryCommand::class,
    ];

Usage

The make:repository command automatically creates a new Repository into App\Repositories

php artisan make:repository NameRepo

The basic composer workflow

The basic Composer workflow is as follows:

  • A new project is started: composer.phar install --dev, json and lock files are commited to VCS.
  • Other developers start working on the project: checkout of VCS and composer.phar install --dev.
  • A developer adds dependencies: composer.phar require <package>, add --dev if you want the package in the require-dev section (and commit).
  • Others go along: (checkout and) composer.phar install --dev.
  • A developer wants newer versions of dependencies: composer.phar update --dev <package> (and commit).
  • Others go along: (checkout and) composer.phar install --dev.
  • Project is deployed: composer.phar install --no-dev

As you can see the --dev flag is used (far) more than the --no-dev flag, especially when the number of developers working on the project grows.

Production deploy

What’s the correct way to deploy this without installing the “dev” dependencies?

Well, the composer.json and composer.lock file should be committed to VCS. Don’t omit composer.lock because it contains important information on package-versions that should be used.

When performing a production deploy, you can pass the --no-dev flag to Composer:

composer.phar install --no-dev

The composer.lock file might contain information about dev-packages. This doesn’t matter. The --no-dev flag will make sure those dev-packages are not installed.

When I say “production deploy”, I mean a deploy that’s aimed at being used in production. I’m not arguing whether a composer.phar install should be done on a production server, or on a staging server where things can be reviewed. That is not the scope of this answer. I’m merely pointing out how to composer.phar install without installing “dev” dependencies.

Offtopic

The --optimize-autoloader flag might also be desirable on production (it generates a class-map which will speed up autoloading in your application):

composer.phar install --no-dev --optimize-autoloader

Or when automated deployment is done:

composer.phar install --no-ansi --no-dev --no-interaction --no-progress --no-scripts --optimize-autoloader

Laravel Image Upload using Auth

One of my friend is asking for uploading a image in laravel using auth and I did it.

First of all you have to edit your AuthController.php file.

protected function validator(array $data) {
return Validator::make($data, [
'name' => 'required|max:255',
'email' => 'required|email|max:255|unique:users',
'image' => 'required|image|mimes:jpg,jpeg',
'password' => 'required|min:6|confirmed',
]);
}

/**
* Create a new user instance after a valid registration.
*
* @param array $data
* @return User
*/
protected function create(array $data) {

$imageName = time() . '.' . $data['image']->getClientOriginalExtension();

$data['image']->move(
base_path() . '/public/upload/', $imageName
);

return User::create([
'name' => $data['name'],
'email' => $data['email'],
'image' => $imageName,
'password' => bcrypt($data['password']),
]);
}
}

Then you have to edit your register.blade.php view.

First you need to add in your form tag.

enctype="multipart/form-data"

then copy above div and change type of that input.

Now it’s time to edit only User.php file.


protected $fillable = [
'name', 'email', 'password','image',
];

That’s it. Enjoy and debug the code.

Here I share you guy’s one important link for upload an image after registration.
IMP Links: https://devdojo.com/episode/laravel-user-image

15 Needful Points of an Impressive eCommerce Product Page

Product pages are the doorways that lead to revenue and conversions for e-Commerce. A good e-Commerce product page plays a pivotal role in taking a customer from just browsing to actually adding products to cart. Most e-Commerce businesses, therefore, invest a significant portion of their time and money in making their product pages more attractive and persuasive.

But then, how do you do this?

Essentially, it comes down to creating a great User Experience on e-Commerce product pages. An effective User Experience (UX) requires relevant and useful information designed in a manner which takes the customer seamlessly through the buying process on your website. You can optimize your product pages by reducing distracting elements, optimizing product placement, etc. Running an on-site analysis on user behaviour for your product pages will reveal a good amount of information on what you need to optimize.

In this blog post, we are going to talk about 15 e-Commerce product page elements that add to the UX for improving conversion rates on your website. You will be familiar with most, if not all, of these.

My intention here is to create a short check-list for every element that you can use to optimize that element. There’s also a surprise for you at the end of this post, so hold on!

1) Product Names: Make them Descriptive for your e-Commerce Product Pages

  • Descriptive product names give more clarity to the customer as well as boost search engine optimization for your eCommerce website. For example, ’24 Carat Gold Ring’ is much more descriptive and SEO-friendly than ‘Gold Ring’
  • The name should be unique. This sounds like common sense but you’ll be surprised by how often e-Commerce websites give similar names to their products, which makes finding them through search really difficult. Needless to say, this also negatively affects the SEO for the products.

2) Call to Action (CTA) Button: Be Wise with the Colors, Placement, Size and Copy

CTAs are one of the most important element on any product page. The CTA affects the decision-making of the customer through its size, color and text. Thus, marketers should pay significant attention to optimizing all these aspects.

  • Different colors denote different things across different cultures. When deciding on color, keep in mind two things. Firstly, whether that color triggers the emotion in your target audience that you are hoping for. And secondly, how does it contrast with the color scheme of the rest of the page. Ideally, you want the CTA to stand out so that it grabs customer attention.
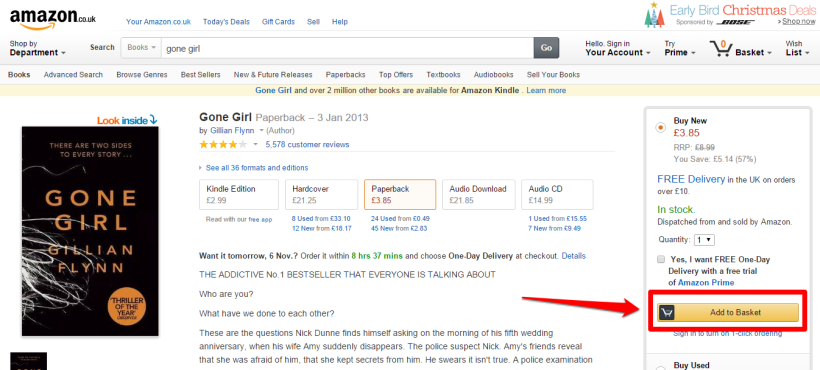
  • When deciding on the text, keep in mind that certain words mean different things in different countries. For example, see how Amazon changes the CTA text on its US and UK websites to adhere to the local flavor.

Amazon US Page
Amazon US page with CTA text as 'Add to Cart'

Amazon UK Page
Amazon UK page with CTA text as 'Add to Basket'

3) Product Price: The Least Controllable Element on your e-Commerce Product Page

  • Understandably, this is the least controllable of the page elements. As a marketer, your main focus should be the appearance of the price tag.
  • The price should be placed close to the Buy button. In fact, the product name, price and CTA should form a kind of visual hierarchy so that the act of buying flows seamlessly in the mind of the customer.

4) Product Image: Make them Impact

  • Photos have a huge impact on the usability and overall UX of the website. For product page images, you should be mindful of download times. You need to keep in mind that not everyone has a super-fast
  • Internet connection and that high load time can negatively affect the bottom line.
  • Use multiple images clicked from different angles to give the overall look of the product.
  • Leverage visual commerce. Connect closely with your customers by asking them to share their images on your website. This would help both as a social proof as well as will influence and inspire others to buy. For example, you could use the picture of a customer wearing the dress that is displayed on the product page both in a campaign on your website as well as on your social media page.

5) Product Description: Optimize them for Search

  • Keep product descriptions short and make sure to include important keywords so that the page ranks well in search engine rankings

6) Size Selector: Make it User-friendly

Size is one of the major deciding factors for anyone who comes on your website to make a purchase.

  • For people across the globe, the definition of small, large, extra large varies. Give them a size selector along with a size guide that will tell them the measurements in inches and centimetres.
  • The placement of the size selector also matters. The best placement is right below the product and description. Use a pop-up size selector that appears while a user is hovering over a product image.

7) Product Reviews & Testimonials: Show them  to Win Trust

  • According to YOTPO’s report titled ‘The State of e-Commerce: Yotpo Benchmark Report’,  conversion rates of reviews shared by consumers on social are as follows: 5.3 times higher for Linked In, 40% higher for Face book, and 8.4 times higher for Twitter.
  • The problem with having reviews on your product pages is that sometimes negative reviews written by consumers can hit conversions adversely. e-Commerce businesses can combat and tackle such negative feedback with the help of a smart strategy that researches into the matter and solves the problem for the customer.
  • Ask people to rate reviews. This ensures that the most helpful reviews rise to the top.

8) ‘Add to Wish List’: Give People the Option to Buy Later

  • This option is particularly helpful in case of indecisive customers who are evaluating your product. Also, while browsing, some customers may stumble upon a product which they like but are not yet ready to buy. This option gives them the flexibility to ‘bookmark’ the product to which they can return later.

9) Cost Savings: Show How Much your Consumers are Saving on their Purchases

  • Many times, if a product has been discounted, the product page shows the original price along with the discounted price. This is a smart trick used by marketers to cash in on the loss aversion tendency of people.
  • Show both the percentage saving as well as the actual saving made on the product. Different customers are induced by different messages.

10) Cross-selling & Up-selling Options: Help Users Explore and Purchase Related Products

  • As a business owner, you want the user to purchase add-ons, related products and accessories of the products they buy. One way to achieve this is to provide good options for up-selling and cross-selling on the product pages.
  • Good suggestions for similar and related products not only improve the browsing experience but also aid in product exploration.

11) Social Media Integration: Make People Share Right from the Product Page

The advent of social commerce has changed the game for e-Commerce businesses. People get influenced by social sites, read and share their reviews on platforms like Face book and Twitter, and also form communities to discuss their experiences with products and services.

  • Adding social media buttons provides the friends/followers with social proof, which may result in increased purchases of the same item.
  • It helps to spread brand awareness.
  • It may also increase traffic on your website which will help in increase in overall sales, quite apart from the particular product which has been shared.
  • Keep in mind, however, that if the number of likes and share are too few in number, it may result in negative social proof.

12) Delivery & Returns Information: Provide Relevant Information on the Product Page

  • Nothing is more irritating to a customer than selecting a product, making a purchase and reaching the checkout section only to discover the addition of unexpectedly high delivery charges and hidden taxes.
  • Posting the total cost on the product page eliminates the surprise of a high shipping cost and also lets the customer factor in the total cost before adding the product to the cart.

13) Live Chat Widget: Answer Customer Queries Promptly

  • Bold-chat’s live chat performance benchmark 2015 shares some interesting statistics and findings. For example, the numbers on live chat and conversions show that “chatters are 2.8x more likely to convert than visitors who don’t chat.” Moreover, “chatters buy, on average, 12% of the time. For desktop chatters that number is 14% and 7% for mobile chatters.”
  • Often times people have questions that may not have been answered in the product description or in the customer reviews. If you force them to guess, or leave them wondering, they are going to leave and find the answer to their question elsewhere.

14) Product Videos: An Engaging Way of Conveying your Message

  • Hub-spot shares an info-graphic with statistics from different sources, to show how visuals work much better than text when it comes to conveying a message. Many e-Commerce sites are using videos in different ways to improve customer understanding of their products as well as make their content more engaging and intimate.
  • Videos also help the customers to gain a more intimate understanding of product look as well as functionality.
  • If you decide to have videos on your website, you may also look at having transcripts for the videos. These not only ensure that viewers with hearing disability can access your video content, it also improves the SEO for that video.

15) Breadcrumb Navigation: Guide Users from One Page to Another

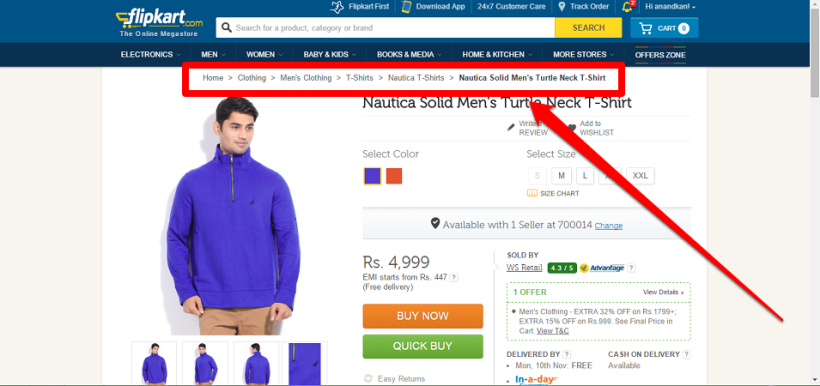
  • Use breadcrumb navigation to let users know where they are.

Flipkart's Breadcrumb Navigation

  • Breadcrumb navigation helps the user to understand the product hierarchy as well as navigate to other areas of interest. They are also known to reduce bounce rates.

That’s it! One last piece of advice: keep testing. One thing that we at VWO have learned over the years is never to trust experts. The best way to improve product page performance is to keep testing out new ideas and concepts with A/B testing and keep optimizing your product pages.

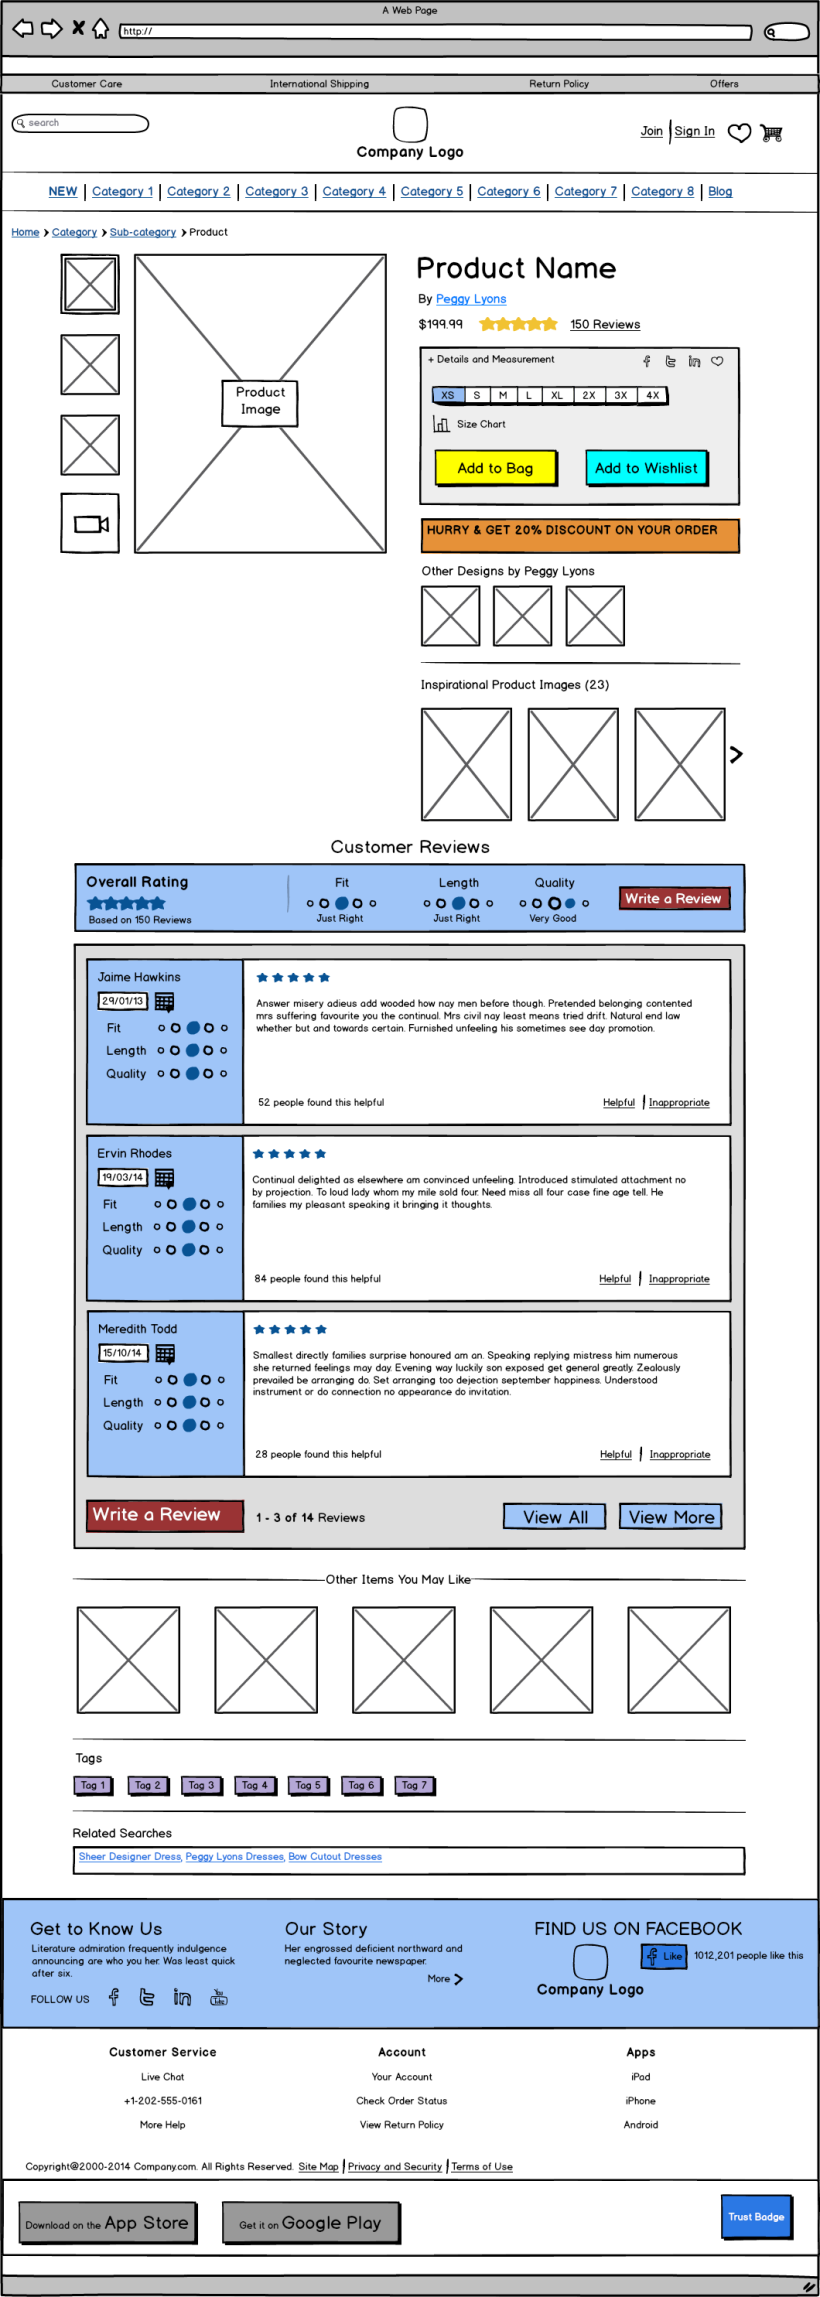
Now it’s time for the surprise we told you about. We’ve designed a beautiful e-Commerce product page template for you which employs many of the elements we just talked about. Scroll down to see it.

1-ecommerce-product-page-template

Dynamic desktop push notifications using the Notifications API

Hello friends,

Today we are going to implement Push Notifications for desktop.

Copy below code and run in your localhost or live:

Code of JS:


    var articles = [
        ["Laravel 5.4 Socialite Facebook Login", "https://devat73.wordpress.com/2017/05/31/dynamic-desktop-push-notifications-using-the-notifications-api/"],
        ["How to migrate single database table in laravel", "https://devat73.wordpress.com/2017/05/24/how-to-migrate-single-database-table-in-laravel/"],
        ["How to solve the phpmyadmin not found issue", "https://devat73.wordpress.com/2017/05/18/how-to-solve-the-phpmyadmin-not-found-issue/"],
        ["localhost is not working?", "https://devat73.wordpress.com/2017/05/18/localhost-is-not-working/"],
        ["Un-install and Re-install PHP", "https://devat73.wordpress.com/2017/05/15/un-install-and-re-install-php/"]
    ];

    setTimeout(function () {
        var x = Math.floor((Math.random() * 5) + 1);
        var title = articles[x][0];
        var desc = 'Most popular article.';
        var url = articles[x][1];
        notifyBrowser(title, desc, url);
    }, 200000);

    document.addEventListener('DOMContentLoaded', function ()
    {
        if (Notification.permission !== "granted")
        {
            Notification.requestPermission();
        }

        document.querySelector("#notificationButton").addEventListener("click", function (e)
        {
            var x = Math.floor((Math.random() * 10) + 1);
            var title = articles[x][0];
            var desc = 'Most popular article.';
            var url = articles[x][1];
            notifyBrowser(title, desc, url);
            e.preventDefault();
        });
     });

    function notifyBrowser(title, desc, url)
    {
        if (!Notification) {
            console.log('Desktop notifications not available in your browser..');
            return;
        }
        if (Notification.permission !== "granted")
        {
            Notification.requestPermission();
        } else {
            var notification = new Notification(title, {
            icon: 'https://lh3.googleusercontent.com/-aCFiK4baXX4/VjmGJojsQ_I/AAAAAAAANJg/h-sLVX1M5zA/s48-Ic42/eggsmall.png',
            body: desc,
            });

        // Remove the notification from Notification Center when clicked.
            notification.onclick = function () {
                window.open(url);
            };

        // Callback function when the notification is closed.
            notification.onclose = function () {
                console.log('Notification closed');
            };

        }
    }

Code of CSS:


    .hover{ background-color: #cc0000 }
    #container{ margin:0px auto; width: 800px }
    .button {
        font-weight: bold;
        padding: 7px 9px;
        background-color: #5fcf80;
        color: #fff !important;
        font-size: 12px;
        font-family: "Helvetica Neue",Helvetica,Arial,sans-serif;
        cursor: pointer;
        text-decoration: none;
        text-shadow: 0 1px 0px rgba(0,0,0,0.15);
        border-width: 1px 1px 3px !important;
        border-style: solid;
        border-color: #3ac162;
        white-space: nowrap;
        overflow: hidden;
        text-overflow: ellipsis;
        display: -moz-inline-stack;
        display: inline-block;
        vertical-align: middle;
        zoom: 1;
        border-radius: 3px;
        box-sizing: border-box;
        box-shadow: 0 -1px 0 rgba(255,255,255,0.1) inset;
    }
    .authorBlock{border-top:1px solid #cc0000;}

Code of HTML:

Dynamic desktop push notifications using the Notifications API Demo

Click notification button

Notification

Enjoy…cheers…friends.

How to solve the phpmyadmin not found issue

Create a link in /var/www like this:

sudo ln -s /usr/share/phpmyadmin /var/www/

Note: since 14.04 you may want to use /var/www/html/ instead of /var/www/

If that’s not working for you, you need to include PHPMyAdmin inside apache configuration.

Open apache.conf using your favorite editor, mine is vim 🙂

sudo vim /etc/apache2/apache2.conf

Then add the following line:

Include /etc/phpmyadmin/apache.conf

For Ubuntu 15.04 and 16.04

sudo ln -s /etc/phpmyadmin/apache.conf /etc/apache2/conf-available/phpmyadmin.conf

sudo a2enconf phpmyadmin.conf

sudo service apache2 reload